How to Restore Windows XP to an Earlier Time with Windows XP System Restore

Windows XP System Restore can restore Windows XP to an earlier time such as a few days ago. Restoring Window XP to an earlier state can be very useful if something goes wrong such as an update or driver causing your computer not to boot properly. In this blog post I will describe how to restore Windows XP to an earlier state using a System Restore point in a few different ways.

System Restore Method

  1. Click Start > All Programs > Accessories > System Tools > System Restore.

    NOTE

    The System Restore window should open.

  2. Select Restore my computer to an earlier time. Refer to Image below.


  3. Click Next to choose the System Restore point.
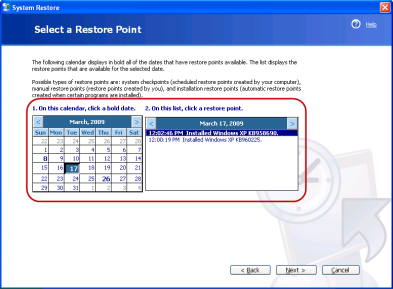
  4. Select the System Restore Point to restore Windows XP to an earlier time. Refer to Image below.


  5. Click Next to start the System Restore process.
  6. Confirm the System Restore point and click Next to start the System Restore process. Refer to Image below.


  7. Windows XP will automatically reboot and show the progress of System Restore. Refer to Image below.


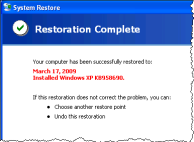
  8. If Windows XP System Restore was successful then a successful message will appear when logging onto Windows XP. Refer to Image below.

Command Prompt Method

  1. Click Start then Run.
  2. Type %SystemRoot%\system32\restore\rstrui.exe on your keyboard.
  3. Press ENTER on your keyboard.
  4. Follow System Restore Method above starting from Step 2 to continue with the System Restore process.

Safe Mode Method

  1. Boot Windows XP into Safe Mode, refer to “How to Start Windows XP in Safe Mode” blog for directions.
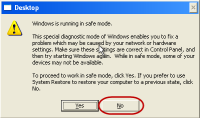
  2. When logged on then select No to launch System Restore. Refer to Image below.


  3. Follow System Restore Method above starting from Step 2 to continue with the System Restore process.

Safe Mode with Command Prompt Method

  1. Boot Windows XP into Safe Mode, refer to “How to Start Windows XP in Safe Mode” blog for directions using the Safe Mode with Command Prompt Method.
  2. Type %SystemRoot%\system32\restore\rstrui.exe in the Command Prompt window.
  3. Press ENTER on your keyboard.
  4. Follow System Restore Method above starting from Step 2 to continue with the System Restore process.

Platforms Tested

  • Microsoft Windows XP Editions
Related Articles

Version 1.1
Edited: May 16, 2012

Elevate a Command Prompt in Windows 7

You may need to elevate the Command Prompt in Windows 7 to perform administrative duties from time to time. There are many more methods to elevate the Command Prompt but in this post I will show a 3 step process.

Elevate Command Prompt – Start Menu

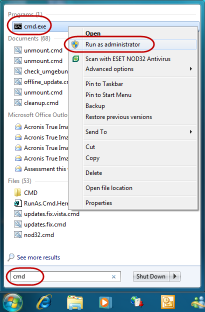
  1. Click Start Orb.
  2. Type:

    cmd

  3. Right-click cmd to select Run as Administrator.

    Start Menu - Launch Elevated Command Prompt

    Tip

    Use CTRL+SHIFT+ENTER to elevate the Command Prompt instead of using the Right-click method above.

Version 1.2
Edited: April 11, 2014

Opening a Command Prompt without Elevation

You do not need to open a Command Prompt with elevation if you are not changing objects to your system. If you need an Elevated Command Prompt in Windows Vista then read "Opening an Elevated Command Prompt".

Here are the instructions that I use to open the Windows Vista Command Prompt.

Opening a Command Prompt without Elevation

NOTE

To enlarge the images, simply click on the images you would like to view. With Internet Explorer 7, you can right-click on the image to select Open in New Tab.

  1. Click on the Start Orb (commonly known as the Start button).
  2. Type cmd in the Start Search field on the Start Menu. Refer to Step 1 on the Image below.
  3. The Programs in the Start Menu in the left pane will populate. "cmd.exe" should appear.
  4. Click on cmd.exeto launch the Windows Vista Command Prompt. Refer to Step 2 on the Image below.
     

  5. Now a Command Prompt window will open. Refer to Image below.
     

NOTE

To enlarge the images, simply click on the images you would like to view. With Internet Explorer 7, you can right-click on the image to select Open in New Tab.

Related Articles

Version 1.3
Edited: May 3, 2012

Adding an Elevated “Command Prompt Here” for Folders and Drives Context Menu

Adding an "Elevated Command Prompt" here for Folders and Drives context menus in Windows Vista is pretty much the same way as you do in Windows XP. You will need administrative privileges (which means Elevated Privileges for Windows Vista) to add the entries in the registry because this is a system-wide change.

The "Elevated Command Prompt" here context menu is a very useful because when you right-click on a folder to select "Elevated Command Prompt" then the Command Prompt window will open with elevated permission at that folder’s location. For example, if you right-click on "c:\program files\program.folder" then the Command Prompt will open with elevated permissions at "c:\programs files\program.folder".

NOTE

To enlarge the images, simply click on the images you would like to view. With Internet Explorer 7, you can right-click on the image to select Open in New Tab.


CAUTION

Editing the Windows Vista registry can cause serious issues such as system instability when editing/deleting the wrong entries. Please use the Registry Editor with extreme caution.

CAUTION

Before making any changes to the Windows Vista Registry, please backup your Windows Vista Registry by creating a System Restore point using the direction from "Create a System Restore Point".

To Add "Command Prompt Here" to a Folder or Drive Context Menu with Elevated Privileges – Manual Method

NOTE

To enlarge the images, simply click on the images you would like to view. With Internet Explorer 7, you can right-click on the image to select Open in New Tab.

For Folders

  1. Open the Registry Editor with Elevated Privileges, refer to "Opening the Registry Editor with Elevated Privileges" blog article for instructions.
  2. Navigate to:

    HKCR\Directory\shell

  3. Create a new key by right-clicking "shell" to select New > Key. Name the new key RunAs.
  4. Double-click (default)located at:

    HKCR\Directory\shell\RunAs

  5. Enter the following in the Value Data filed:Elevated Command Prompt
  6. Create a new key by right-clicking "RunAs" to select New > Key. Name the new key command.
  7. Double-click (default)located at:

    HKCR\Directory\shell\RunAs\command

  8. Enter the following in the Value Data field:

    cmd.exe /s /k pushd "%V"

    [HKCR\Directory\shell\RunAs]
    Name: (default)
    Type: REG_SZ
    Data: Elevated Command Prompt

    [HKCR\Directory\shell\RunAs\command]
    Name: (default)
    Type: REG_SZ
    Data: cmd.exe /s /k pushd "%V"

For Drives

  1. Open the Registry Editor with Elevated Privileges, refer to "Opening the Registry Editor with Elevated Privileges" blog article for instructions.
  2. Navigate to:

    HKCR\Drive\shell

  3. Create a new key by right-clicking "shell" to select New > Key. Name the new key RunAs.
  4. Double-click (default)located at:

    HKCR\Drive\shell\RunAs

  5. Enter the following in the Value Data filed:Elevated Command Prompt
  6. Create a new key by right-clicking "RunAs" to select New > Key. Name the new key command.
  7. Double-click (default)located at:

    HKCR\Drive\shell\RunAs\command

  8. Enter the following in the Value Data field:

    cmd.exe /s /k pushd "%V"

    [HKCR\Drive\shell\RunAs]
    Name: (default)
    Type: REG_SZ
    Data: Elevated Command Prompt

    [HKCR\Drive\shell\RunAs\command]
    Name: (default)
    Type: REG_SZ
    Data: cmd.exe /s /k pushd "%V"

To Add "Command Prompt Here" to a Folder or Drive Context Menu with Elevated Privileges – Using Reg Add

  1. Open a command prompt with Elevated Privileges, refer to "Opening an Elevated Command Prompt" blog article for instructions.
  2. Type the following in the elevated commands prompt window:
    • For Folders:

      reg add HKCR\Directory\shell\RunAs /ve /d "Elevated Command Prompt"

      reg add HKCR\Directory\shell\RunAs\command /ve /d "cmd.exe /s /k pushd \"%V\""

    • For Drives:

      reg add HKCR\Drive\shell\RunAs /ve /d "Elevated Command Prompt"

      reg add HKCR\Drive\shell\RunAs\command /ve /d "cmd.exe /s /k pushd \"%V\""

To Add "Command Prompt Here" to a Folder or Drive Context Menu with Elevated Privileges – Using a Registration File – Method 1

NOTE

To enlarge the images, simply click on the images you would like to view. With Internet Explorer 7, you can right-click on the image to select Open in New Tab.

  1. Download RunAs.Cmd.Here.reg to a folder on your hard drive.
  2. Open a command prompt with Elevated Privileges, refer to "Opening an Elevated Command Prompt" blog article for instructions.
  3. Change directories to the folder where you saved RunAs.Cmd.Here.reg. For example, if you saved the RunAs.Cmd.Here.reg file to "c:\users\Bill", then type the following in the elevated command prompt window:

    cd "c:\users\Bill"

  4. Then type the following in the elevated command prompt window to merge the registration file into the registry:

    RunAs.Cmd.Here.reg

  5. Click Yes to confirm you want to merge the RunAs.Cmd.Here.reg file into the registry.
  6. A confirmation window will appear asking if you want to merge the RunAs.Cmd.Here.reg registration file into the Windows Vista registry. Click Yes to continue with the merge of the registration file. Refer to Image below.

  7. If you are successful with merge of the RunAs.Cmd.Here.reg registration file then the following window should appear. Refer to Image below.

    NOTES

    The RunAs.Cmd.Here.reg file is from my company web server (http://lprf.homeserver.com).  You also can view the contents of the RunAs.Cmd.Here.reg file by right-clicking the file and selecting Edit. You may need to log off then log on to your user account or restart your computer for the changes to take affect.

To Add "Command Prompt Here" to a Folder or Drive Context Menu with Elevated Privileges – Using a Registration File – Method 2

NOTE

To enlarge the images, simply click on the images you would like to view. With Internet Explorer 7, you can right-click on the image to select Open in New Tab.

  1. Download RunAs.Cmd.Here.reg to a folder on your hard drive.
  2. If you have added "Run as Administrator" context menu for registration file using this article, "Adding "Run as Administrator" to a Registration File Context Menu" then right-click RunAs.Cmd.Here.reg to select Run as administrator.
  3. A UAC Prompt should appear to allow access to the elevated Registration merge. Click on Continue to allow the elevated Registration merge to continue. Refer to the Image below.

  4. A confirmation window will appear asking if you want to merge the RunAs.Cmd.Here.reg registration file into the Windows Vista registry. Click Yes to continue with the merge of the registration file. Refer to Image below.

  5. If you are successful with merge of the RunAs.Cmd.Here.reg registration file then the following window should appear. Refer to Image below.

    NOTES

    The RunAs.Cmd.Here.reg file is from my company web server (http://lprf.homeserver.com).  You also can view the contents of the RunAs.Cmd.Here.reg file by right-clicking the file and selecting Edit. You may need to log off then log on to your user account or restart your computer for the changes to take affect.

NOTE

To enlarge the images, simply click on the images you would like to view. With Internet Explorer 7, you can right-click on the image to select Open in New Tab.

Related Articles

Platforms Tested

  • Microsoft Windows Vista, x86 versions

Version 1.5
Edited: May 3, 2012

Opening an Elevated Command Prompt

You may need to open an Elevated Command Prompt in Windows Vista to run some command line tasks that require administrative privileges. Opening an Elevated Command Prompt is a simple task to perform. There are three methods you can use and here are the instructions that I use to complete this task.

Opening an Elevated Command Prompt – Method 1

  1. Click on the Start Orb (commonly known as the Start button).
  2. Type cmd in the Start Search field on the Start Menu.
  3. Press CTRL+SHIFT+ENTER.
  4. Accept the UAC Prompt.
  5. A Command Prompt should open with elevated privileges.

Opening an Elevated Command Prompt – Method 2

NOTE

To enlarge the images, simply click on the images you would like to view. With Internet Explorer 7, you can right-click on the image to select Open in New Tab.

  1. Click on the Start Orb (commonly known as the Start button).
  2. Type cmd in the Start Search field on the Start Menu. Refer to Step 1 on the Image below.
  3. The Programs in the Start Menu in the left pane will populate. "cmd.exe" should appear. Right-click on cmd.exe to access the context menu. Refer to Step 2 on the Image below.
  4. Select Run as administrator in the Context menu for "cmd.exe". Refer to Step 3 on the Image below.


  5. A UAC Prompt should appear to allow access to the elevated Command Prompt. Click on Continue to allow the Elevated Command Prompt window to open. Refer to the Image below.
     

  6. Now a Command Prompt window will open with elevated privileges. Refer to Image below.
     

Opening an Elevated Command Prompt with a Shortcut – Method 3

NOTE: It is assumed that Windows Vista is installed on the C drive of your computer. If Windows Vista is not installed on the C drive of your computer then replace C with the system drive letter for Windows Vista.
  1. Right-click on an empty area of your Desktop to select New > Shortcut. A New Shortcut wizard window will appear. Refer to Image in Step 2.
  2. In the Type the location of the item:box type the following:c:\windows\system32\cmd.exe

    Then click the Next button to continue with the Create Shortcut wizard. Refer to Image below.

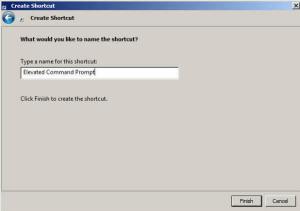
  3. In the Type a name for this shortcut:field, type the following:Elevated Command Prompt

    Click Finish to complete the Create Shortcut wizard for the Elevated Command Prompt Shortcut.

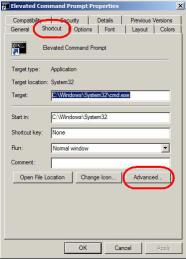
  4. Right-click the Elevated Command Prompt shortcut located on your Desktop to select Properties.
  5. Ensure the Shortcut tab is selected for the Elevated Command Prompt Shortcut properties page. Click the Advance button. Refer to Image below.
     

  6. Place a checkmark for Run as administrator in the Advanced Properties window. Refer to Image below.
     

  7. Click OK two time to exit the Elevated Command Prompt shortcut properties page.
NOTE: To enlarge the images, simply click on the images you would like to view. With Internet Explorer 7, you can right-click on the image to select Open in New Tab.

Related Articles

Version 4.1
Edited: May 2, 2012